60-70s birthday party, decorations and more

My mother turned 50 about a week ago and threw a 60’s/70’s themed party. She encouraged her guests to wear something reminiscent of the 60’s or 70’s, a hard task for someone who was born in the middle of the 80’s if you ask me.

I spent hours and hours googling, asking around, googling some more and collecting inspiration from everywhere I could find it. I watched movies, searched for celebrities from that era and watched a documentary about Abba. I visited a bunch of stores to see what they had to offer (I don’t like second hand items from unknown people so I didn’t visit any stores of that kind, silly, I know). Unfortunately the current trends seems to be too much 80’s, might have worked if I aimed for a really late 70’s look. Since I completely missed that you were “allowed” to wear clothes from the 60’s too my focus was a 100% on the 70’s and after a while I decided to go for the disco look. I’m not very fond of the hippie style that ruled both the 60’s and the 70’s. I’d rather go for the trends of the 50’s if any, which I suppose also appeared in the early 60’s.
Anyway, I bought a slightly 60’s/70’s  inspired dress as a backup if my upcoming plans didn’t work out. I started sketching on a suit with tights legs and wide cuts, lots of glitter and shiny materials. After some research I decided to go for a deep halterneck top in a shiny fabric together with my sequin ruffled flared legs (is this even a proper name for them?) and the cherry on top: the afro wig. I had some glasses and bracelets at home and I also happened to have this wide, golden belt and large earrings. It couldn’t get any better than this! The shoes might have been the least 70’s inspired part of my suit but at least they were looking like a combination of sandals, clogs and plateau shoes.
The fabric hunting was also interesting, I happened to find the sequin fabric in a store i Östersund while on a customer visit for work. I was worried that I didn’t buy enough for both flares and a top, so I found a shiny fabric here in Stockholm which was just perfect for what I had in mind! The pattern I used for the top was a combination of two Burda patterns found in two of my magazines I still keep from 2006 and 2007. I used to have a subscription on that magazine for a few years and I still keep all the issues and the random ones I still buy every now and then. One of the patterns was a halterneck top and the other a tank top with a deep neckline, it is a bit big and the fabric quite stretchy but it worked fine for one night.
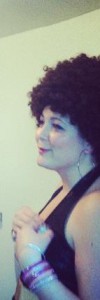
When I was finished with my clothes for the evening my last challenge was the make up part (soooo happy I bought a wig and didn’t have to think about the hair too) which didn’t go exactly as I planned. Youtube and google told me pastel colors, eyeliner and orange lips were the trends of the 70’s. Lavender eyeshadow, thick cat eyeliner, pale pink lipgloss and fake eyelashes. And of course: glitter and shiny eyeshadow as a highlighter all over the place! It was decent but I was disappointed with the colors. I should have used more eyeshadow to make the color pop but I mostly used the glasses anyway so it doesn’t matter that much.

Right before the party I watched a few dance tutorials on youtube for the John Travolta dance from Saturday night fever and picked up a few funky moves. It was awesome.

Here’s a picture of the outfit for the evening and one where you can see the makeup slightly better.

image 308902_4904130516216_596920654_n2

A closer image of my fake flares. I didn’t sew complete pants, just the flares and put some elastics on the top to make them stick right below my knee. I just wore a pair (or two, it was cold) of shiny leggings and put them over my shins.

image

I just have to show you the decorations for the party. My handy mother and husband made the fence with flowers and the table decorations! I helped her cut the smilies with my Big Shot, the other decorations are made of some sort of mdf board.

image

I also cut out these wine glass tags with my Big Shot, both orange and yellow paper and my mother added all the guest’s names on them.

image


Leon’s third birthday card

My cousin Leon turned three a few days ago and he wanted a white dress for a princess costume. He was very certain with the looks of the dress, no puffy cupcake-styled dress! It was supposed to be simple with some pearls and a necklace. So I made him a card, found a dress (wish I’ve had time to sew one for him instead) and pimped it a bit. I think he liked the dress but he did look somewhat disappointed when he opened the present. We asked him to put it on with the tiara and all and he did, he’s such a sweet boy! Now I have the perfect picture for his graduation day, he he. Just another 15 years to go!

Here’s the card and the dress:

I decided to make an easel card for the Alota Rubber Stamps’ challenge #81 and since the card is for a young boy I decided to enter Going Buggy’s April challenge which was  to make a card for a child, any age, too!
The card was easy to start with, I had to have Lightning McQueen on it since it’s his favorite from Cars! The letters are just a lot with all the colors but it turned out OK and I got an opportunity to use them!


A little something

Long time no posting, I know.. It doesn’t mean I haven’t been creative tho! I’m just a bit lazy and… yeah that’s it. I have been trying to organize stuff and learning new techniques. Since the scrapbooking/card making thing is quite new to me I have a lot to learn. I purchased a bunch of cute stamps and now I’m mostly practicing working with aquarelle.
I also have a few birthdays coming up so there will be lots of reasons for practicing card making too. Yay!

Anyway, I made a simple thing for Malin and her new apartment. I have one myself in blue and my mother has one in yellow. I got the idea from her actually, not sure where she got it from tho.
Since Malin keep her bathroom in black and white I decided to make one what would match!

Last but not least. My brother had his birthday a few days ago and I baked a bunch of cookies for his birthday dinner. Dangerously delicious as usual and very appreciated!
I also made a few for my aunt when I was visiting my new born cousin, she liked them too!

Yummy!

DIY: Yoko’s scarf

I finally had the time to draw the instructions for how to make the scarf, I’m not very artistic but I hope you can understand it anyway.

First of all you will need to get these items before starting:

  • Fabric, I used fleece in two different colors but use whatever you like! you will need 7 pieces and one piece is 12×42 cm. So if you have a fabric that is 140 cm wide, you’ll need about 30 cm of it. This scarf is quite big so if you prefer a smaller one or a kid sized, you’ll need even less!
  • A 20 cm zipper
  • About 2,5 m silk ribbon of your choice, I recommend to use a ribbon wider than 1 cm.
  • A sewing machine (or a lot of time)
  • Thread
  • Scissors
  • Pins

First step: Cut out 7 pieces of the fabric. Each piece at 12 x 42 cm and measured for 1 cm seam allowance.

Pin the pieces together with the right sides facing each other, start with one pair and add the pieces one by one. Sew them together with a straight seam.

Since I didn’t have my iron with me, Malin suggested that I sew a wide zig-zag seam over the seams to press them down. Very clever idea!

When you’re done it’s time to attach the ribbons. I measured and cut them on the scarf but they should be about 42 cm long.
Pin and sew the ribbon from the right sides, hide the seams with the ribbons and use a thread in the same color as the ribbon. I sewed quite close to the ribbon edges, as close as possible will give a better result!

When the ribbon is in place I sew a zig-zag seam over the edges to avoid the ribbon from unravel. If you use a fabric that might unravel you will have to do this on all sides.

Fold the scarf with the right side facing itself and the zig-zag edges touching. Make sure you see the back side before sewing along the edges and leave a few centimeters open in the middle so you can turn it inside out later on.

The scarf should now look something like this.

And now it’s time for the tricky part. Fold the scarf so the seam is in the middle of it and attach the zipper, one part on each side of the scarf. Make sure it’s turned right and that the zipper is on the inside from here, also make sure the seam-side will become the inside. Pin and sew the zipper, try to get the seam close to the zipper using the appropriate presser foot.
Before sewing you can turn it inside out to check it looks good and seems to be correct, just be careful with the pins.

When you’re done it’s time to turn it inside out and make sure you can use the zipper. If you have to change something just do it now. If not then close the hole on the inside either using your sewing machine or by hand. It will look better if you do it by hand but it works just as good with the machine. Just make sure to leave the outer fabric alone so there will be no seam visible from the outside.

And now you’re all set!

Suit up!

Today was the international suit up day (according to facebook) and since I like to dress up and join masquerades etc I wasn’t late on planning my look for the day.

I found an old suit my granny and I made for my graduation five years ago and the jacket still fitted, somewhat at least. It surely did look better five years ago, he he. Anyway, I won’t miss an opportunity to dress up and wear a tie!

I was very satisfied with the result of our sewing, her are some pictures, not the best but good enough to get an idea. Both patterns were taken from Burda magazines, not related to each other.
I never had the time to add lining to the jacket but it looks good anyway!

Another sewing project I had the same summer was clothes for my mother’s wedding. I used patterns from Burda this time too and the fabric I used was dupion silk. I also made a purse in the same fabric.
I like details and I sew some of the visible seams with silver glittery thread and I embroidered a silver heart on the skirt.
The silk was nice and cool during the warm summer day in the end of August. I wore black ballerina shoes as well, the same shoes I wore on my graduation day. Love them!

Shopping bag bonanza

Shopping bags are lovely! Easy to make and personalize and good for the environment if it helps you purchase fewer plastic bags!

I made the first bag back in 2004, a dark and cold winter and I needed some crafting therapy!
I found a lovely curtain fabric with black and gray flowers. It was love at first sight and I still use that bag every now and then. I had to replace the handles and made the second pair of a stronger fabric. Plain and thin cotton is not recommended!

Anyway, my mother also wanted a bag and a friend of mine too and even my granny got jealous of my pretty bag. She loves shopping bags (not plastic ones) and has lots of them. They are getting quite worn out now and she wanted something more fancy.
All bags are made of at least two layers of fabric, which should be enough to hold for heavy groceries as well.

The first picture is of my bag, the first one. Second picture is the one for my mother, third is my granny’s and the forth is the latest bag to the collection! All are made of curtain fabric and cotton on the inside. I couldn’t find any pictures of the one for my friend but it was white with gray and purple chickens, she loved it :)

I have plenty of fabric waiting to be used for bags. Whenever I find a suitable fabric I by a meter or two for future projects. I’m sure there will be more shopping bag posts here later on!