DIY: Yoko’s scarf

I finally had the time to draw the instructions for how to make the scarf, I’m not very artistic but I hope you can understand it anyway.

First of all you will need to get these items before starting:

  • Fabric, I used fleece in two different colors but use whatever you like! you will need 7 pieces and one piece is 12×42 cm. So if you have a fabric that is 140 cm wide, you’ll need about 30 cm of it. This scarf is quite big so if you prefer a smaller one or a kid sized, you’ll need even less!
  • A 20 cm zipper
  • About 2,5 m silk ribbon of your choice, I recommend to use a ribbon wider than 1 cm.
  • A sewing machine (or a lot of time)
  • Thread
  • Scissors
  • Pins

First step: Cut out 7 pieces of the fabric. Each piece at 12 x 42 cm and measured for 1 cm seam allowance.

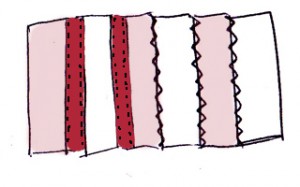
Pin the pieces together with the right sides facing each other, start with one pair and add the pieces one by one. Sew them together with a straight seam.

Since I didn’t have my iron with me, Malin suggested that I sew a wide zig-zag seam over the seams to press them down. Very clever idea!

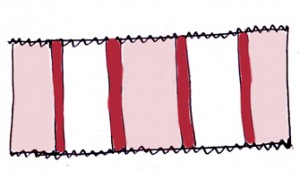
When you’re done it’s time to attach the ribbons. I measured and cut them on the scarf but they should be about 42 cm long.
Pin and sew the ribbon from the right sides, hide the seams with the ribbons and use a thread in the same color as the ribbon. I sewed quite close to the ribbon edges, as close as possible will give a better result!

When the ribbon is in place I sew a zig-zag seam over the edges to avoid the ribbon from unravel. If you use a fabric that might unravel you will have to do this on all sides.

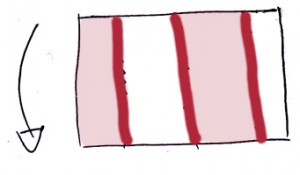
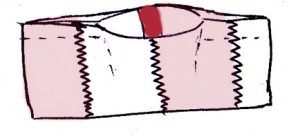
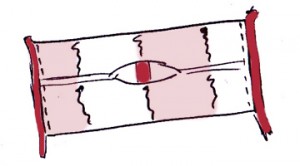
Fold the scarf with the right side facing itself and the zig-zag edges touching. Make sure you see the back side before sewing along the edges and leave a few centimeters open in the middle so you can turn it inside out later on.

The scarf should now look something like this.

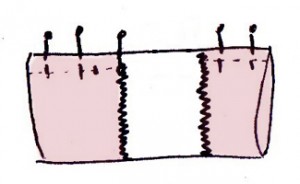
And now it’s time for the tricky part. Fold the scarf so the seam is in the middle of it and attach the zipper, one part on each side of the scarf. Make sure it’s turned right and that the zipper is on the inside from here, also make sure the seam-side will become the inside. Pin and sew the zipper, try to get the seam close to the zipper using the appropriate presser foot.
Before sewing you can turn it inside out to check it looks good and seems to be correct, just be careful with the pins.

When you’re done it’s time to turn it inside out and make sure you can use the zipper. If you have to change something just do it now. If not then close the hole on the inside either using your sewing machine or by hand. It will look better if you do it by hand but it works just as good with the machine. Just make sure to leave the outer fabric alone so there will be no seam visible from the outside.

And now you’re all set!

Creating Christmas

As you might have figured from the previous post, I’m making some sort of Advent decoration. I have been thinking about buying a traditional Advent candlestick, kinda like this one but a bit more festive with white moss and mushrooms and maybe some Christmas gnomes. Just like the one we used to have when I grew up.
I still haven’t got a candlestick suited for this purpose or any kind of decoration, I just don’t know why I haven’t bought anything during these four years. Very strange, but on the other hand good because if I did, I might not have started with this neat project!

I went to IKEA yesterday with my oldest younger brother to buy large candles, FIXA floor protectors and fabric. I’m still looking for some nice fabric for my kitchen but it seems impossible to find anything I like.
So.. I had six items on my shopping list and I came home with about 20. I found lots of nice things I’ve been looking for for a while, such as patterned baking cups, a small Christmas tree plus decorations, pastry cutters, a splatter screen and (finally!) handles for my wall cabinets!

When I came home I couldn’t keep myself from decorating the candles, trying different materials and ribbons. I also had to find a solution for attaching hangers on my numbers. Luckily I have a few eye pins to spare, some super glue, a nail and a hammer. I made a hole with the nail, filled it with glue and stuck the eye pins in the hole. I made sure the loop was turned right in order to hang it on a ribbon or thread.
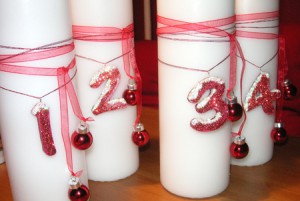
When the glue was dry I decorated the candles with organza ribbons, glittery embroidery thread and the tiny Christmas baubles. I’m not sure they are done yet, I will leave them for a few days to see if I miss anything. I also have to find another candle dish. The one I bought was a bit small and.. round.. I realized I need a rectangular shaped dish instead..
I also need to find some decorations for the candle dish so I have to go shopping anyway!

Here’s what the candles look like at the moment, not too bad to be honest! Less is more, right?

Categories UncategorizedCategories

It’s been a while…

So.. I’ve been quite quiet for a while now, mostly because of the photoshop course I had to finish. I put the rest of my life on hold and it took a while to get back on track again. Now it’s back to normal again and I have been working a bit with the DIY for the scarf and a new Christmas project!

It’s not finished yet but I’ll give you a sneak peak with some pictures of the process! I’m going to buy a few items for the project (and another one I’ve had in mind for a few years) later today! Yay!

I think I have to start working on my Christmas cards quite soon too and all the Christmas gifts. Christmas is the worst time of the year (I still love it tho), so much to do and so little time! I have a list of Christmas goodies I’m planning to make such as saffron buns (love love love), an awesome gingerbread house and some snacks! I might even try making my own truffle again, hopefully more successful than last year. I also plan to make my own Mozartkugeln. I just love them!
I think the list of Christmas cakes and candy will grow larger in the near future! Luckily I got a long weekend before Christmas Eve so I might actually have the time to do all this and more!

Anyway, here’s the promised sneak peak!

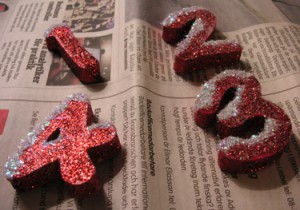
Started off with painting the numbers red.

Added some glitter…

..and some more glitter! Kinda looks like snow, doesn’t it?